Handmade Christmas Card Using the Blended Seasons Bundle
Looking to make a handmade Christmas card using the Blended Seasons Bundle from Stampin' Up!? Here is project idea featuring three of the images from that stamp set.
In case you have no idea what I am talking about with the Blended Seasons bundle, here is what you need to know. This is a limited edition bundle that is being released on August 1st and last until August 31st OR WHILE SUPPLIES LAST – whichever comes first.
The bundle includes the Blended Seasons stamp set and the Stitched Seasons Framelits shown below.

Here is another project just using the stamp set. Here is a project that uses both the stamp set and framelits.
But this today's project moves us into Christmas!
The Stamping
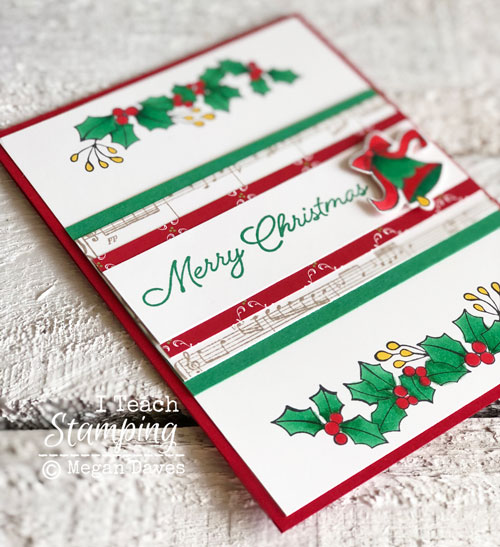
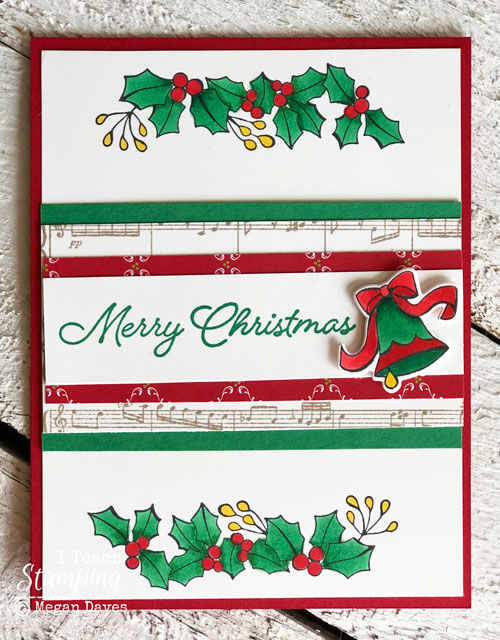
I wanted to stamp my holly leaves and color them in with my Stampin Blends. Because of that, I chose to stamp my holly leaves in Memento Tuxedo Black ink pad – that is the specific ink pad that the Stampin Blends were designed to work best with. I stamped them at the top and the bottom of a piece of Whisper White card stock (4″ x 5-1/4″)
Next, I stamped my sentiment in Call Me Clover ink onto a strip of Whisper White card stock, but not in the center, more towards the left side, as I wanted to make sure I had room for the bell.
Then I stamped the bell also in Tuxedo Black ink onto a scrap of Whisper White card stock.
The only other stamping I did was using the Sheet Music background stamp. That was inked up and stamped onto more Whisper White 2″ x 4″ in Crumb Cake ink.

The Coloring
I started with choosing my Stampin Blends colors: Call Me Clover, Poppy Parade & Pineapple Punch. I colored them one leaf at a time, following the pattern of coloring it all in in light, then my shaded areas in dark, and then blending it all with my lights. Here is an example of how that is done.
The same was done with the bell.
The Die Cutting
At first, I completely forgot that there was a die cut and fussy cut out a bell. When I actually looked at my dies and saw there was a die, I quickly colored another bell and die cut it out – which looked 1000 times better!

The Final Assembly
I chose a Poppy Parade card base and started building it all out. As I worked on my sentiment layer, it just fell a little flat on the Sheet Music piece I had stamped. Luckily, I have scraps laying around. I first tried a strip of Poppy Parade, but it wasn't just right. But I did have scraps of the Under the Mistletoe Paper (which is still part of the buy 3 get one 1 free promo that ends 7/31).
Even though that patterned paper is Real Red, it wasn't off enough from Poppy Parade to make a difference in my opinion.
The Supplies
Here is a list of supplies, minus the Blended Seasons Bundle. To order any of the items and get a jump start on your Christmas cards this year, simply click on an item and add it to your shopping bag 🙂


Wanna Pin It?
Here is a great graphic for you to Pin so you can refer to it later.

Thank you so much for checking in. Be sure to check back tomorrow! Today was all about handmade Christmas card using the Blended Seasons Bundle – any ideas of what tomorrow will bring?


You’re getting me in the Christmas card making mood! Great card, very festive and love the colors!
Beautiful card Megan. I look forward to making this one.
Thanks for sharing.
Hi Megan, This is a really cute card using the new stamp set. Is there a way to receive email updates when you add new creations to your website? I don’t want to miss any of your wonderful cards and tips. Thanks!
Hi Linda! The best way to stay up to date is to sign up for my email list on the right side of the blog 🙂 Have a great day!